My work laptop (Dell D630) was frustratingly slow and an upgrade was still a year away, so I invested in my own SSD. I'm a little worried about the longevity since it's Windows XP and the company monitoring tools are always hitting the hard disk, but the performance boost is beautiful. Boot times fell from ~4:30 to ~1:30 and the system in much more responsive during everyday use. Here's a screenshot of Soluto's boot-time log -- the big drop in boot time is from installing the SSD (exact copy of the previous disk). Side note -- I love Soluto!
Wednesday, February 15, 2012
Sunday, January 8, 2012
I had been having trouble accessing a Dell 960w wireless all-in-one printer from my Windows 7 Professional PC, but my wife's Windows 7 laptop always worked fine. I was troubleshooting another problem (same symptoms, but for NSLU2 network drive). Turns out that one solution solved both problems: http://windows7forums.com/windows-7-networking/5323-mapping-network-drive-windows-7-rc.html
Here's the content from that answer:
- Click Start
- Click Control Panel
- Click System and Maintenance
- Click Administrative Tools
- Double-Click Local Security Policy
- In the left pane, click the triangle next to Local Policy
- In the left pane, click Security Options
- In the right pane near the bottom, double-click "Network security: LAN
manager authentication level"
- Click the drop-down box, and click "Send LM & NTLM responses"
- Click OK
NSLU2 with Windows 7 Professional
I was having trouble accessing my stock NSLU2 through Windows 7 Professional, and found the following link solved the problem: http://windows7forums.com/windows-7-networking/5323-mapping-network-drive-windows-7-rc.html
Here's the content from that answer:
- Click Start
- Click Control Panel
- Click System and Maintenance
- Click Administrative Tools
- Double-Click Local Security Policy
- In the left pane, click the triangle next to Local Policy
- In the left pane, click Security Options
- In the right pane near the bottom, double-click "Network security: LAN
manager authentication level"
- Click the drop-down box, and click "Send LM & NTLM responses"
- Click OK
Here's the content from that answer:
- Click Start
- Click Control Panel
- Click System and Maintenance
- Click Administrative Tools
- Double-Click Local Security Policy
- In the left pane, click the triangle next to Local Policy
- In the left pane, click Security Options
- In the right pane near the bottom, double-click "Network security: LAN
manager authentication level"
- Click the drop-down box, and click "Send LM & NTLM responses"
- Click OK
Monday, September 6, 2010
Things I Like: Adidas Barricade Tour II 3-Pack Bag
This is the first post in a series titled "Things I Like". My family often laments how picky I am when it comes to "gear". I decided to post these in case anyone else out there had the same "specs" that I had.
Tennis Bag Required Features
Solution: Adidas Barricade Tour II 3-Pack Bag (Adidas Barricade II Tour 6 Pack Tennis Bag)
Perfect fit of my stuff:
Tennis Bag Required Features
- Holds 2-3 rackets
- Shoe tunnel
Really, that's all I wanted, but had a hard time finding it. This struck me as odd as I know many players who carry two rackets and tennis shoes. Everyone I asked said to get a smaller 6-pack bag, but they were too large for my needs.
Solution: Adidas Barricade Tour II 3-Pack Bag (Adidas Barricade II Tour 6 Pack Tennis Bag)
Perfect fit of my stuff:
- 2 Wilson Six-one:95 rackets
- 1 pair size-11 shoes
- Water bottle
- Tennis clothes
- Sunglasses (in the microfiber-lined "media" pocket)
- 2-3 canisters of tennis balls
- Assorted small items (vibration dampeners, sweat towel, etc.)
Sunday, August 29, 2010
Post-Trip Photo Post-Processing
After returning from vacation, I wanted to develop a flow for post-processing my photos. It didn't go very well, but this ugly process got me there.
1. Tweak photos and add captions in Picasa
This includes minor color and contrast adjustments, cropping, and adding captions. Nothing too tricky here.
2. Add Borders and Copyright information in Gimp
This is where it got tricky. I modified the batch processing plug-in for Gimp called PhotoLab to add a border that I liked better than the original. I also added copyright information that is written on the border. The biggest hurdle though was Gimp itself -- the built-in jpg save functions lose all the metadata, including the photo-taken timestamp that I use to sort the photos and the captions that I added in Picasa.
To rectify this problem, I called the executable version of exiftools from within the python script. A better way would have been to code it directly into the plug-in, but I ran out of patience for that. Hopefully the upcoming Gimp version 2.8 will fix this problem.
It is not particularly robust, but these items are essential:
- Gimp python script capability must be installed (http://www.gimpusers.com/tutorials/install-python-for-gimp-2-6-windows.html)
- exiftool.exe needs to be on your path (http://www.sno.phy.queensu.ca/~phil/exiftool/)
3. Rename the Photos, in almost chronological order.
I wanted to rename my photos in the order that I wanted them to appear in the album. This is almost chronological order, but I added a cover image and map (the original motivation came from having images from two cameras that had unique numbering schemes. There are probably a dozen better ways to do this, but I was burnt-out on this project by now. I did this by
- Copying the two images I wanted first to a directory named "renamed_images" and manually editing their names.
- Ran the following exiftools command: exiftool -fileOrder CreateDate -filename=Norway_Aug2010%-c.jpg -directory=renamed_images/%d .
The command moves the files, adding a copy number to the end.
4. Credits
1. The "base" of the script was batch processing for adding borders and title information from the PhotoLab suite of Gimp tools. http://registry.gimp.org/node/157
List of changes:
2. I replaced the border with a modified version of the border implemented in the two_color_borders.py script. http://registry.gimp.org/node/24635
4. Credits
1. The "base" of the script was batch processing for adding borders and title information from the PhotoLab suite of Gimp tools. http://registry.gimp.org/node/157
List of changes:
- Changed the "title" feature to be a copyright feature
- Placed the copyright information on the border (size scales with border so it always fits).
- Replaced the border with one I liked better (see #2 below)
- Used exiftool to preserve metadata (see #3 below)
- Note: I have not renamed the script from the PhotoLab original.
- Note: The script is now limited to JPG images (mostly to preserve metadata)
2. I replaced the border with a modified version of the border implemented in the two_color_borders.py script. http://registry.gimp.org/node/24635
- Changed the script so that the border overlays the edges of the current image in order to maintain the original aspect ratio. A quick code change can switch it back (I meant to make this an option, but ran out of time).
3. In order to "preserve" metadata, I used ExifTool (http://www.sno.phy.queensu.ca/~phil/exiftool/) to copy the metadata from the original JPG to the new JPG.
- Note: ExifTool.exe must reside on your path.
Sunday, April 4, 2010
Removing Duplicate Files
Want to save some disk space? How about removing all duplicate copies of your files? Fortunately, there are free tools to help you do this. I used DoubleKiller after reading the LifeHacker post: http://lifehacker.com/330037/top-10-free-windows-file-wranglers.
- Found many data files that were duplicates
- Found many copies of VIRSCAN*.dat files from Symantec AntiVirus. Deleted all the ones in *.tmp folders (actually, moved them to a holding location). No issues so far.
- If you have multiple copies of Matlab installed, I would recommend removing those from the search path
Check out WinDirStat from the that LifeHacker post too.
Modifying the Windows-E Shortcut Key's Behavior
Background: Pressing the key combination [Windows Logo Key] + [e] opens Windows Explorer.
[EDIT] Recently noted my personal computer has "My Documents" appearing ahead of C:\. I need to find out how to get that for my work computer.
I use this short-cut all the time, but I was annoyed that it always opened with the C:\ fully expanded, which took-up most of the viewable space in the left-hand pane of Windows Explorer.
After a bit of web-searching and playing around, I found a solution.
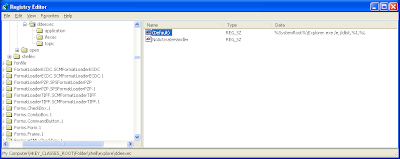
- Go to: Start Menu -> Run -> regedit
- Locate the registry key: HKEY_CLASSES_ROOT\Folder\shell\explore\ddeexec
- The (Default) value should be something like: %SystemRoot%\Explorer.exe /e,/idlist,%I,%L
- Delete this value so that the entry is blank (right-click on (Default), choose "Modify")


[EDIT] Recently noted my personal computer has "My Documents" appearing ahead of C:\. I need to find out how to get that for my work computer.
Subscribe to:
Posts (Atom)