Sunday, May 24, 2020

Adding V-brakes (linear brakes) to a Co-op Cycles Rev 16 bicycle

Parts
  • Evolution V-Brakes adapter (from Porkchop BMX here)
  • Tektro 930AL bicycle V-brake and 313A right hand lever set (from Porkchop BMX here)
    • 313A brake lever
    • 930AL V-brake
    • 2x V-brake mounting screws
    • Brake cable
    • Cable housing
    • Cable end crimp
  • Brake cable holders 
    • Could use zip-ties
    • Porkchop BMX sold out, tried something from Amazon, but still looking for a good solution
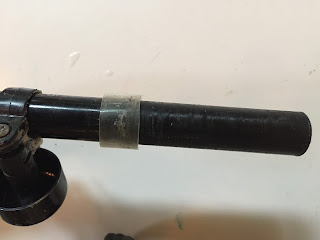
  • Shim to fit 22.2mm ID brake lever to 19mm OD handle bar
    • Used 3/4" OD, 5/8" ID clear vinyl tubing that I had laying around

Tools
  • Cable cutters
  • Crimping tool
  • Torque wrench
  • 5mm hex socket (for torque wrench)
  • 4mm hex socket (for torque wrench)
  • 2mm hex key for brake lever reach adjustment (not shown)
  • Phillips screwdriver for moving bell (not shown)

Background
    I bought a Co-op Cycles Rev 16 bike for my son about 3 years ago.  I don't know much about bikes, but this one seemed a good compromise between quality, weight and cost.  Not long after buying it, I learned about Woom cycles and I really liked their philosophy of teaching kids to use their hands from braking from the beginning.  While it is too late for my kids to start from hand brakes, I thought I could at least get them started now.  My soon losing the chain (and thus coaster brakes) on a recent bike ride provided the final nudge. :-)
  

Alternatives
    This conversion costs nearly $100.  It would have been better to buy a bike with hand operated brakes in the first place.  I even checked local classifieds and could have bought a used bike with V-brakes for $80 (but it was very masculine and I plan on handing this bike down to my daughter).  Anyhow, I decided to plow forward and enjoy the project regardless of practicality.

The bike
     The bike has a mount for caliper-style brakes and I could have been done for $20-$30.  However, I found multiple references to people saying their kids' hands were not strong enough to brake with caliper brakes, and that V-brakes work much better.  I decided to take their word for it.  
     Of course, the Rev 16 doesn't have V-brake mounts, so that's where the Evolution V-brake adapters come into play.  They're clamp on V-brake mounts, but be aware that they will damage the paint on the bike where they're clamped on.
     The next obstacle is that the handle bars on the Rev 16 are 19mm in diameter at the grips, while the industry standard is 22.2mm.  Tektro does make kid-specific brake levers for 19mm handlebars (see here), but the kit ordered from Porkchop was a great deal.  I instead used a bit of vinyl tubing as a "shim". 


Conclusion
     I am very impressed with the Tektro kit.  Everything seems to be good quality and they paid attention to the details.  The Evolution adapters are well-designed and well-made too.  
     My son hasn't ridden yet, so no verdict yet on how it all worked.  I am a bit worried the levers are still too long a reach even with the adjustment screw maxed-out.  If so, I'll source a longer screw.  The kid specific levers might work better, but I haven't tried them.


Monday, October 8, 2018

Organize your summer

Last summer, a friend of mine launched a website for finding kids' summer camps.  Packed with great information and a handy scheduling system, it's the perfect way to organize your summer plans.

Check it out at https://www.camplicity.io/


Sunday, April 24, 2016

Rachio Iro Smart Sprinkler Controller: Will it save money?

Ever since we moved into our house several years ago, I've been frustrated by the unnecessary complexity of our sprinkler controller.  "Smart" sprinkler controllers have been on the market for a while, but I was put off by the cost.  However, the Rachio Iro (1st Gen, 16 zone) went on sale for $150 (here) as inventory was cleared for the 2nd Gen model, I finally pulled the trigger.


Wednesday, April 20, 2016

Windows 10 (Upgrade) Frequently Crashing

After upgrading a laptop (HP Envy dv6-7214nr) from Windows 8 to Windows 10, the laptop would frequently crash.  Google Chrome was almost guaranteed to cause a crash, but even after uninstalling that, the laptop would frequently crash.

Checking Windows 10's reliability monitor showed "Apple Push" as the most frequent cause of the crash, but I could find no way to disable the "Apple Push" service.

A bit of google searching led me to this link http://answers.microsoft.com/en-us/windows/forum/windows_10-hardware/upgraded-to-windows-10-but-now-msvcp100dll-is/68475c07-090a-4fe8-9a0f-7d5f1ac0cbde?auth=1.

While not an exact match for my issue, I decided to try uninstalling all versions of "Microsoft Visual C++  20xx Redistributable".  And it worked!  A few programs that relied on the missing components failed to run, but that was easily solved by reinstalling them.


Saturday, February 1, 2014

Streaming video from Windows Media Player to PS3

We had not streamed video from Windows Media Center to our PS3 for quite a while, and when I recently tried it, it didn't work.  We could see all the files on the PS3, but when we tried to play them we would get a black screen and eventually error number 80710092.

Since the last time we had used the setup, our router had died and been replaced.  After an hour of digging through settings on the new router (ASUS RT-N56U), streaming still didn't work.  The solution actually turned out to be quite easy.  The PC running Windows Media Center had had its network mode switched to "Public", which prevent media streaming -- perhaps from when the router was changed.  I switched the PC back to "Home" network mode and streaming was back in action!


Saturday, January 18, 2014

Skiing Utah, 2014

Thanks to some sweet airfares to Salt Lake City and generous babysitting from grandparents, we headed to Utah for some fantastic skiing, beautiful scenery and fun with friends.
Shredding the Pow at Powder Mountain

Saturday, December 21, 2013

A Day Hike on the Coast of Fife, Scotland


While Jack Frost was toying with family and friends back home in Dallas, Scotland was enjoying a bit of warmer-than-normal weather.  With the business meetings over, I escaped for a few hours of coastal walking before heading home.  After a short train and bus ride from Edinburgh, I was in St. Andrews.  Here are a few (cellphone) photos from my trip.


Saturday, August 17, 2013

How to Coil a Cable, Hose, Cord, etc.

I found this video eye-opening. I have always tried to wrap cables, hoses, power cords, etc. neatly, but it never seems to work well. Turns out I was trying to do the wrong thing all along.

http://www.wired.com/gadgetlab/2013/08/tnhyut-coil-cable/

Once your cable has been coiled "wrong", it takes a while to work out all the twists but once that's done this method seems to work quite well.

Wednesday, August 7, 2013

Shoe Sole Repair

The sole on one of my dress shoes had come loose on one edge.  I went to fix it with ShoeGoo, but found my tube had dried out (no surprise -- I have no idea how many years I've had it).

Looking around for an alternative, I found some Loctite "Pit Crew's Choice Adhesive and Sealant".  It worked perfectly, maybe even better than the ShoeGoo.

Wednesday, June 5, 2013

Bicycle Commute: Cost vs. Benefit

[Update:  On Oct. 1 2013, I broke-even on my initial investment :-))]

I have started occasionally riding my bicycle to work.  The commute is about 6miles, one way, and almost entirely on a bike trail through park land.  It is really an ideal bicycle commute.

One concern is that I would use it as an excuse to spend big $$ on bike equipment, but never recover the cost.  To keep expenditure in check, I decided to keep track.  Costs are self explanatory.  I have set the $ benefit of a bike commute at $5.  About $3 is direct gas savings, and the rest is just a fudge factor to give me a fighting chance of "earning" more than I spent.  (In my defense, using the tax code's standard mileage deduction, the car commute is worth $6).

Here's where I'm at right now:

Thursday, May 30, 2013

SiliconDust HD Homerun and Windows 7 Media Center

Every so often the cable company changes the frequency of it's channels and my Windows 7 Media Center and my HDHomerun get out of sync.

For some reason, none of the automatic methods for program assignment work for me.  I searched for it a bit and concluded it was most likely a setup issue from my cable vendor (TimeWarner).  I decided to bite-the-bullet and do it manually, but even that took some work.

My Process

1. Open HDHomeRun Setup and get a list of channels that the HDHomeRun sees.  
2. Look-up your TV signal's information on http://www.silicondust.com/support/channels/
This will tell you the type of signal (QAM64, QAM256) and helped me decode the real channel number.

3. Open Windows Media Center and go to the "Add Missing Channels" menu option.
4. Click "Add QAM Channel".  Enter the channel number.  This is the number from the "Tune" column of the  HDHomeRun Setup.  For instance, "CH18-1" would be entered as 18.1.
5. Select the proper QAM setting.  This information is available from the SiliconDust Channels website. 
6. Give the channel and name and add it.
7. Go to "Edit Channels" and click the channel you just added.
8. Go to "Edit Listings"
9. Find the proper listing for the channel.  You can type the first few characters of the channel name (i.e. KTVT) and it will take you to the matches.  Select the proper channel.
  You're done...with one channel.
10. Repeat for all the channels.  Fortunately there are only a few free unscrambled OTA channels.

Tuesday, April 30, 2013

Android Contacts App Crashing

I noticed recently that my Android Contacts app.  I noticed that it started after installing the Outlook.com app, so I uninstalled that app but it did not resolve the problem.

It turns out that I needed to uninstall the original Hotmail app.  Once that was uninstalled, Contacts works fine and I was able install Outlook.com no problem.

Wednesday, April 17, 2013

Tennis Serve: The Slice

A few notes from my coach on how the hit a slice serve.

  1. Continental grip
  2. Toss to front right, i.e. towards the far corner towards your front right. (In 1 o'clock direction a few inches into the court).
  3. Pause in trophy position
  4. Rotate shoulders, horizontally, first
  5. Follow with arm and wrist motion; be sure to add speed with arm and wrist.  Don't just use your shoulder rotation to whip your arm.
  6. Follow through in the direction that you would like the ball to go.  

Sunday, March 3, 2013

Things I Like: Mountain Hardwear Kelvinator Down Jacket

I have avoided down gear most of my lift based on a suspected childhood allergy.  Realizing that most of my childhood allergies have disappeared (except Mountain Cedar!!), I decided to give down a chance.

My first piece of the down gear:  the Mountain Hardwear Kelvinator Jacket.  I love it!  It fits me perfectly, and the Cherry Bomb color is awesome ("Great Balls of Fire" by Jerry Lee Lewis pops in to my head every time I put it on).

Disclaimer:  I'm not a very good judge of down gear, obviously, since this is my first piece.  But I won't every be without a down jacket again.

Tuesday, February 26, 2013

A Letter to Amazon on Sales Tax

If anyone knows how to easily generate a sales-tax-paid report from your Amazon account, please share in the comments below.

----------------------------------------------------------------------------------------------------------
Dear Amazon,

Would you add a feature in the “Your Account” section of the Amazon website to generate a sales-tax-paid report?  The goal is to provide your customers an easy method for deducting sales tax paid through Amazon from our federal taxes.

Benefits:  
  • Your customers are happy that their tax bill is reduced.
  • You earn more money as customers view taxes paid at Amazon as less than taxes paid elsewhere. 
  • It is completely legal.
  • The cost to implement is tiny; you have already provided the capability for generating annual purchase reports.

I look forward to hearing from you, and seeing this new benefit.

Best Regards,
Will

Wednesday, February 15, 2012

SSD impact on Boot Times

My work laptop (Dell D630) was frustratingly slow and an upgrade was still a year away, so I invested in my own SSD.  I'm a little worried about the longevity since it's Windows XP and the company monitoring tools are always hitting the hard disk, but the performance boost is beautiful.  Boot times fell from ~4:30 to ~1:30 and the system in much more responsive during everyday use.  Here's a screenshot of Soluto's boot-time log -- the big drop in boot time is from installing the SSD (exact copy of the previous disk).  Side note -- I love Soluto!


Sunday, January 8, 2012


I had been having trouble accessing a Dell 960w wireless all-in-one printer from my Windows 7 Professional PC, but my wife's Windows 7 laptop always worked fine.  I was troubleshooting another problem (same symptoms, but for NSLU2 network drive).  Turns out that one solution solved both problems:   http://windows7forums.com/windows-7-networking/5323-mapping-network-drive-windows-7-rc.html

Here's the content from that answer:


- Click Start
- Click Control Panel
- Click System and Maintenance
- Click Administrative Tools
- Double-Click Local Security Policy
- In the left pane, click the triangle next to Local Policy
- In the left pane, click Security Options
- In the right pane near the bottom, double-click "Network security: LAN
manager authentication level"
- Click the drop-down box, and click "Send LM & NTLM responses"
- Click OK

NSLU2 with Windows 7 Professional

I was having trouble accessing my stock NSLU2 through Windows 7 Professional, and found the following link solved the problem:  http://windows7forums.com/windows-7-networking/5323-mapping-network-drive-windows-7-rc.html

Here's the content from that answer:


- Click Start
- Click Control Panel
- Click System and Maintenance
- Click Administrative Tools
- Double-Click Local Security Policy
- In the left pane, click the triangle next to Local Policy
- In the left pane, click Security Options
- In the right pane near the bottom, double-click "Network security: LAN
manager authentication level"
- Click the drop-down box, and click "Send LM & NTLM responses"
- Click OK

Monday, September 6, 2010

Things I Like: Adidas Barricade Tour II 3-Pack Bag

This is the first post in a series titled "Things I Like".   My family often laments how picky I am when it comes to "gear".  I decided to post these in case anyone else out there had the same "specs" that I had.

Tennis Bag Required Features
  • Holds 2-3 rackets
  • Shoe tunnel
Really, that's all I wanted, but had a hard time finding it.  This struck me as odd as I know many players who carry two rackets and tennis shoes.  Everyone I asked said to get a smaller 6-pack bag, but they were too large for my needs.


Solution:  Adidas Barricade Tour II 3-Pack Bag (Adidas Barricade II Tour 6 Pack Tennis Bag)
 
Perfect fit of my stuff:

  • 2 Wilson Six-one:95 rackets
  • 1 pair size-11 shoes
  • Water bottle
  • Tennis clothes
  • Sunglasses (in the microfiber-lined "media" pocket)
  • 2-3 canisters of tennis balls
  • Assorted small items (vibration dampeners, sweat towel, etc.)


Sunday, August 29, 2010

Post-Trip Photo Post-Processing

After returning from vacation, I wanted to develop a flow for post-processing my photos. It didn't go very well, but this ugly process got me there.

1. Tweak photos and add captions in Picasa
This includes minor color and contrast adjustments, cropping, and adding captions. Nothing too tricky here.

2. Add Borders and Copyright information in Gimp
This is where it got tricky. I modified the batch processing plug-in for Gimp called PhotoLab to add a border that I liked better than the original. I also added copyright information that is written on the border. The biggest hurdle though was Gimp itself -- the built-in jpg save functions lose all the metadata, including the photo-taken timestamp that I use to sort the photos and the captions that I added in Picasa.
To rectify this problem, I called the executable version of exiftools from within the python script. A better way would have been to code it directly into the plug-in, but I ran out of patience for that. Hopefully the upcoming Gimp version 2.8 will fix this problem.

It is not particularly robust, but these items are essential:
The script can be found here:  http://registry.gimp.org/node/24708

3. Rename the Photos, in almost chronological order.
I wanted to rename my photos in the order that I wanted them to appear in the album. This is almost chronological order, but I added a cover image and map (the original motivation came from having images from two cameras that had unique numbering schemes. There are probably a dozen better ways to do this, but I was burnt-out on this project by now. I did this by
  1. Copying the two images I wanted first to a directory named "renamed_images" and manually editing their names.
  2. Ran the following exiftools command: exiftool -fileOrder CreateDate -filename=Norway_Aug2010%-c.jpg -directory=renamed_images/%d .
The command moves the files, adding a copy number to the end.

4. Credits
1.  The "base" of the script was batch processing for adding borders and title information from the PhotoLab suite of Gimp tools.  http://registry.gimp.org/node/157

List of changes:
  • Changed the "title" feature to be a copyright feature
  • Placed the copyright information on the border (size scales with border so it always fits).
  • Replaced the border with one I liked better (see #2 below)
  • Used exiftool to preserve metadata (see #3 below)
  • Note:  I have not renamed the script from the PhotoLab original.
  • Note:  The script is now limited to JPG images (mostly to preserve metadata)

2.  I replaced the border with a modified version of the border implemented in the two_color_borders.py script.  http://registry.gimp.org/node/24635
  • Changed the script so that the border overlays the edges of the current image in order to maintain the original aspect ratio.  A quick code change can switch it back (I meant to make this an option, but ran out of time).
3.  In order to "preserve" metadata, I used ExifTool (http://www.sno.phy.queensu.ca/~phil/exiftool/) to copy the metadata from the original JPG to the new JPG.
  • Note:  ExifTool.exe must reside on your path.